Tilt-shift, a DIY guide - part 2, How do tilt shift lenses work?
Posted on Fri 02 July 2010
Our current understanding of tilt-shift photography is shaped by the formal mathematics developed by Theodor Scheimpflug, initially for correcting perspective distortions in aerial photographs. Scheimpflug observed that by changing the angle of the lens relative to the camera body, he could change the perspective in the image.
Lens movements
Tilt-shift lenses are often used in architectural photography. Parallel lines that appear to converge due to perspective distortion can be realigned to appear parallel. Sometimes the terms 'perspective control' (PC) lens and 'tilt shift' (TS) lens are used interchangeably; perspective control lenses are often a specialised type of tilt-shift lens, often with shift-only movements.

In the illustration above, the top left box shows a typical shooting scenario where the camera is placed pointed upwards towards a building at an angle so that the entire building is in frame. However, it is sometimes desired in architecture to get a perspective projection so the building appears "front-on" with neat orthogonal projection (right box of the illustration). This can be achieved while shifting the lens and slightly tilting camera body. Lens shift without some rotation is basically an off-center crop within a large image circle. An example application of this is to create seamless panoramas without the need for specialised stitching software.
Tilt movements of the lens change the angle of the focal plane relative to the camera body. In a normal shooting scenario, the plane in which objects are in sharp focus is parallel to the camera and the lens. If the lens is tilted, this place of sharp focus becomes tilted as well. Scheimpflug is widely credited with developing the formal mathematics to describe the angle of this tilt.
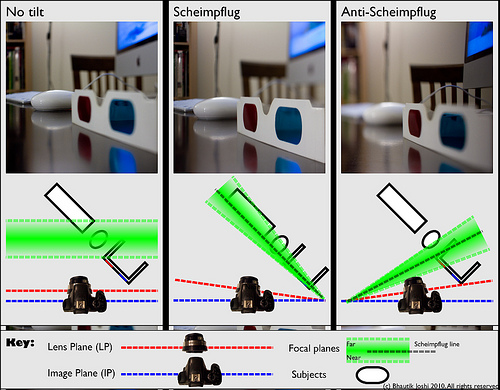
On the far left of the illustration above, we see a camera in a normal shooting scenario. Parallel to and in front of the lens plane, there are the near and far focal planes. Anything that is viewed by the camera in the volume between these planes is acceptably in-focus. Tilting the lens causes these near and far focal planes to no longer be parallel to the lens plane, turning the focal volume from a box into a wedge. The apex of this wedge lies along the line where the lens plane and the image plane intersect. The rotation and position of this in-focus 'wedge' is governed by the Scheimpflug rule.
By carefully adjusting the tilt, it is possible to greatly shorten or extend the range of objects you can have in focus. By using a Scheimpflug rotation, as shown in the middle box of the above illustration, it is possible to move the line along which everything is in focus (sometimes called the Scheimpflug line) so that it follows a plane that is not parallel with the camera body. Here, the Scheimpflug line is aligned with the object being photographed, allowing for more of it being in focus than an un-tilted lens will permit.
On the other hand, by using an anti-Scheimpflug rotation, the opposite effect can be used to artificially make the amount of the object in focus smaller by having the Scheimpflug line intersect at an almost perpendicular angle with the object (far right of the above illustration).
How does tilt-shift miniaturisation work?
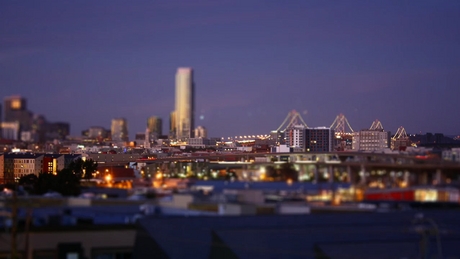
Anti-Scheimpflug rotation can be further exploited to 'miniaturise' subjects - that is, to make them look like that they are part of a tiny toy set. Many photographers use this to great effect, such as Olivio Barbieri and Kieth Loutit.
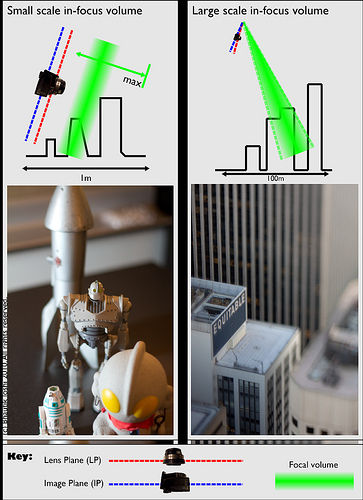
On the left of the figure above we can see the region of space that is in-focus in front of the camera (I'm going to refer to it as the 'in-focus volume') being used to isolate an object. This shallow focus technique with model sets gives us the distinctive toy town look (people who film scale models for visual effects commonly try to maximise their depth of field to avoid this effect!). However, when trying to photograph life-sized objects (such as a building) such tight control of focus is typically not possible. Objects that lie completely past half the hyperfocal distance away cannot be isolated in the same way.
By shooting from an elevated position and using a tilt-shift lens, it's possible to place the in-focus volume so that it extends past the hyperfocal distance and can be used like a narrow-beam in-focus volume to narrowly pick out large structures such as buildings or vehicles (see right hand side of the miniaturisation figure above).
The size of this wedge can be greatly varied by subtle changes in the tilt and shift of the lens, as well as tilting the entire camera and lens together. It's also worth noting that composition is an important factor here - anything that lies in the in-focus volume will be clear and unblurred, so it's important to line up the objects in your scene so that you don't end up highlighting something unexpected (e.g. a corner of a building in the foreground that just intersects the in-focus volume).
How the human visual system uses focus cues to estimate the size of a scene is not very well understood at this stage (a good discussion of this is in section 4 of Held et al.). In the tilt-shift miniaturisation scenario, it can be argued that when we use the in-focus volume to pick out a large object, we are tricked into thinking that the in-focus volume only works with small objects and so the subjects appear small.
Faking it?
Tilt-shift miniature fakes make it easy to create selective focus images without the need for specialised camera equipment. The method of creating the 'tilt-shift effect' in Photoshop or similar is well documented and it can also be easily applied to video.


But can post-processing achieve the same effect as using a real tilt-shift lens? For miniaturisation, a recent study, "Using Blur to Affect Perceived Distance and Size" by Held et al. from the Computer Graphics department at UC Berkeley, demonstrated that careful choice of the placement of the blur gradient in the image will create a convincing miniaturised image. This result was verified by showing a series of test 'faked' images to volunteer subjects; they found a significant connection between the amount of blur and the perceived 'scale' of the miniaturised objects. Moreover, another recent paper by McCloskey et al demonstrated that the pattern of out-of-focus blur caused by lens tilt is a linear gradient. As stated in Held et al., "...it stands to reason that a tilt-and-shift image could be similar to a sharply rendered image treated with a linear blur gradient."
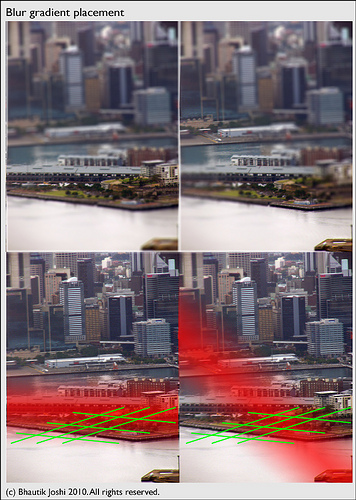
There are a number of small tweaks you can make to improve the look of a tilt-shift faked image: If possible, use a real lens blur filter instead of a simple Gaussian (or similar) blur The blur gradient should run along what you choose to be the ground plane. A poor choice of gradient alignment won't be as convincing - see the above figure If you are using a soft blurring mask, don't just pick a narrow band of sharpness and have the rest of the image uniformly blurry. Ensure that as you move away from the line of sharpness the blurriness keeps on increasing right out to the edges of the image * If you are going for a toy look, increase the saturation and contrast of the image a little
One interesting approach that is a compromise between real and fake tilt-shift image capture is Smallgantics, developed by Bent Image Labs. Here several image planes receding away from the camera (i.e. z-depth planes) are captured simultaneously; each plane has significant elements identified, and these elements and planes are blurred by different amounts to place the image tilt-plane in space. The major advantage of this technique is that it is arguably of better quality than a just one image plane, and allows the tilt plane to be arbitrarily placed and moved at any time, allowing for significant creative freedom.
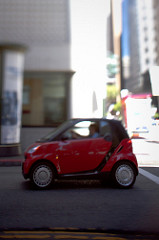
Real tilt-shift images, however, introduce a number of subtle artifacts that are difficult to reproduce via faking. In the above 'miniaturised' image, the lens has been tilted and shifted ever so slightly. While a simple treatment of a sharp version of the image could reproduce the blurring, the slight lens shift introduced by the DIY lens design introduces perspective distortion (note the elongated wheels) which add significantly to the cartoonish miniature effect. These perspective distortions are difficult to reproduce in photoshop. More significantly, tilt-shift lenses can be used for more than just miniaturisation (i.e. selective focus effects) and most of these applications are much more difficult (or even impossible!) to reproduce in photoshop.